Previously, I wrote about my 3¼" x 4¼" Graflex RB Series D camera. In part one, I gave a history of Folmer & Schwing and the Graflex camera, as well as gave an overview of this particular camera and its controls. If you want to see that, I suggest you check it out here.
Here in part two, I will be discussing how I cut 3¼" x 4¼" sheet film for this camera, how I develop it and show off some example photos.
Making 3¼" x 4¼" Sheet Film
At this point in time 3¼" x 4¼", or the quarter plate size, is the dog of the sheet film world. 4" x 5" and even 8" x 10" film sheets remain available in various emulsions, but for 3¼" x 4¼" you have limited options.
If you want a ready made supply of film this size you have two options, Shanghai manufactures their GP3 emulsion in 3¼" x 4¼", and Astrum (Svema) in Ukraine will also custom cut their Foto 100 film to this size. However, both of these are medium speed black and white options, so if you want something else you will need to cut your own. Neither are particularly inexpensive either.
By being able to cut your own film down, you open yourself up to any emulsion available in 4x5 or larger sizes, as well as other sources of film.
In my case, I was fortunate enough to acquire two rolls of large format roll film for relatively inexpensive ($10 each) from this year's Michigan Photographic Historical Society swap meet. They're both about 20 years expired, but I took the chance thinking I would get decent results.
First, a 9.5" x 125' roll of Kodak Plus-X Aerographic.
Next, a roll of 5" x 100' Fortepan 400.
Now, this is the method I have found to be both best and cost effective when it comes to cutting down this film. There may be other ways to do this, but this is what works best for me.
You will need the following:
- A darkroom or (more restrictive) changing bag.
- Your film of choice.
- Two 8x10" developing trays. You can use something else, or nothing, but I find it best to set the roll of film into the upright tray so it can't roll away and then set the cutter on the inverted tray so the film can come off, over the top of the roll and right into it.
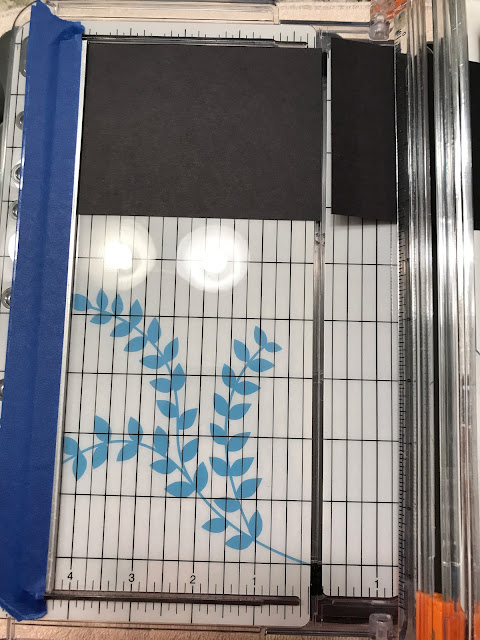
- A paper cutter with stops that you can feel in the dark. Or in my case two. These are Fiskars SureCut paper trimmers that have sliding blades. Conveniently, they can accommodate a material up to 9.5" wide. In this case, I have taped a piece of half inch aluminum strip to each board at 3¼" and 4¼" to act as stops for the film. You can do this with only one paper cutter, but it requires moving the stop without exposing the film you have already cut.
- Rubber gloves to help prevent fingerprints on the film. I am using powder free nitrile gloves.
- A lightproof storage container for your cut film. Here I am using the Graflex Cut Film Magazine.
Now, you want to do the following in total darkness, otherwise you will expose the film. If you have orthochromatic film, you can use a deep red safelight. For all other color and panchromatic films, total darkness.
Here, I am using a piece of black construction paper to illustrate the cutting process so I do not expose my large film rolls.
Begin with the shorter dimension cutter or stop on your cutter. This wastes less film. Here I have the 3¼" board.
Now, here we have our film stand-in coming off the roll, and feeding under the cutting guide and hitting the stop. I normally have the film emulsion side down to help with curl.
I am illustrating cutting a 9½" roll here, but the 5" roll or a piece of 4x5" film is the same, just with two cuts rather than three.
With the film against the stop, run the cutting blade up to the top and then back down to the bottom. Running it both ways ensures the film is fully cut through, which can be tricky for some Estar base films.
We now have a cut piece of film that is 3¼" x 9½". Normally I would cut many of strips this size, and put away the large film roll before moving on.
Now we want the 4¼" board.
Feed the strip of film previously cut into the 4¼" cutter so that the narrow edge is parallel the stop.
Once it is square, run the cutter up and then back down again. Starting from the bottom helps keep the film square to the board. We now have a single piece of 3¼" x 4¼" cut film. Set that aside.
With the remaining piece of film, rotate it 180 degrees so that the edge you just cut is facing away from the stop. This ensures that each of your final sheets has one factory edge, which again helps keep the film square. Then make the final cut.
You should now be left with two 3¼" x 4¼" pieces of film and a piece of scrap 1" wide if using 9½" film to start. If using 5" wide film it would be ¾".
Now you need to either put your cut film sheets in a lightproof storage container, or load it into your film holder. Here's how to load the Graflex Cut Film Magazine.
In the light, either before you begin cutting your film, or after it has been stored in a lightproof container, open the back of your Cut Film Magazine. Inside you will find 12 or 18 metal septums numbered on the back. You want to arrange these so you can find them in the dark and load them, in order, into the magazine.
If you want the red window on the back of the magazine to display the numbers 1 to 12 as you shoot, you need to order them so that they stack up in the order 2, 3, 4, 5, 6, 7, 8, 9, 10, 11, 12, 1 from the bottom.
Once you have your septums arranged, turn out the lights and take out your cut film sheets.
You want to load each septum with the film emulsion side facing out towards the lens. For the film cut from the large rolls, this is easy, the film curls into the emulsion side. If cutting larger sheet film, make sure your notch is positioned such that you can identify it on your finished cut sheet.
In order to load the septums in the dark, note that they have a metal lip on 3 sides. I find it easiest to begin by slipping one corner into the lip on one side.
Run your finger down the edge of the film to flatten it down towards the opposite lip. Then, start sliding the corner of the film already under the lip towards the open end so that it squares up in the holder.
You should now be able to slip the other corner under the opposing lip and get that side started. Now, just slide the sheet down until it is fully in the holder.
Once in the holder, place it into the magazine body so that the edge with no lip is opposite the leather bag, and the number faces away from the lens. Repeat this 12 or 18 times, or as many sheets as you want to load. You don't need to load all the septums, but all the septums need to be in the magazine to ensure the film is pressed against the film plane. Once loaded, attach to the camera and start shooting.
Developing 3¼" x 4¼" Sheet Film
Once you have shot your film, the next challenge will be developing it.
You can develop sheet film in trays in the dark, but this needs to be done one by one, in the dark and can lead to additional scratches. I wasn't a fan of that option.
There are also dedicated sheet film tanks, but they tend to be either expensive (Stearman Press, Paterson Orbital) or large, leaky units that can't be inverted and require large volumes of chemicals.
What I wanted was to use my Paterson two roll film tank, which I already had, so that I could develop my film normally with inversions as I normally do for roll films.
Proposal one: My first idea was to modify a reel so that it would accept film 3¼" wide. I could then insert sheets and have them follow the spiral.
Problem: Because of how thin the film I am using is (because it is roll film cut into sheets) and because the way I cut it, the curve is along the short edge. Thus, the film will flex and fall out of the reel. Proposal one: failure.
Proposal two: I read about the "taco method" which uses either a rubber band or hair band to hold the sheets of film in a taco shape. The "tacos" are then placed in the Paterson tank with only the spindle and funnel in place and developed that way.
Problem: Again, because of how thin the film base I am working with is, it flexes too easy and sheds the bands during agitation. It wanders about in the tank and the sheets touch each other. Better support is needed. Proposal two: failure.
Proposal three: The Success.
Now, this is the method that has been working successfully for me. Call it the modified taco method.
What you will need is to buy a roll of fiberglass screening material. You can buy a large roll from the hardware store for about $10. Do not be alarmed by the fact that it is fiberglass, it is actually quite soft and will not scratch the negatives.
With your roll of fiberglass screening, cut it into a number of sheets approximately 3¼" x 5½". These dimensions are not critical, but it is better to be slightly over 3¼" than under.
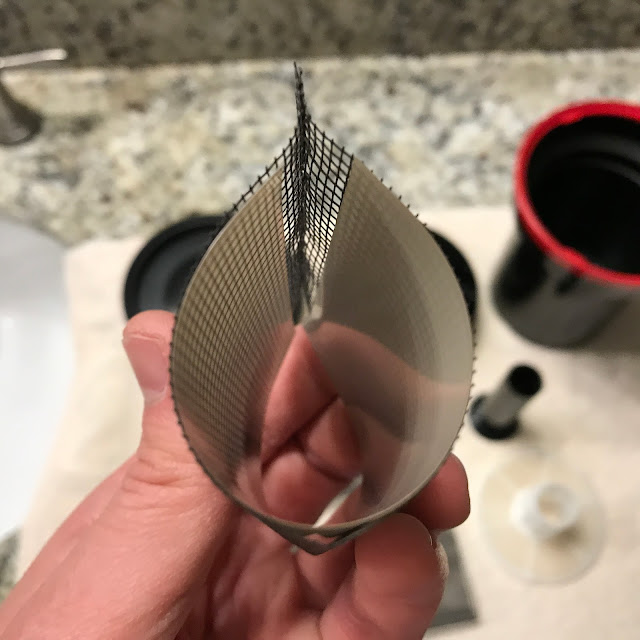
Fold these sheets into the taco shape so that the long edge is the one being curved. Then staple the two ends together about ⅛" from the end. Originally I was sewing these, but staples work just as well and are much faster.
You should then be left with something looking like this:
Now, I can fit five of these in my Paterson tank, so I made five. In addition to these you will need the Paterson tank itself, its spindle, its funnel and its rubber lid. You will also want one side of a roll film reel, the side with the smaller internal diameter that fits on the spindle.
In total darkness, unload your film sheets from the magazine. Gently roll your film sheets into a taco shape that is 3¼" long (or as we turn it, tall), with the emulsion side facing in.
These can then be inserted into one of the screen mesh holders with minor difficulty. This results in the film being well supported, but the emulsion side not contacting anything.
Now, prepare the Paterson tank by putting the center spindle in place. Both the spindle and the funnel are needed to ensure light tightness.
I then arrange the film holders around the spindle like this. I can fit five in my tank
Next, put the one side of the film reel over the spindle. This keeps the sheet film holders pressed down at the bottom of the tank under the fluid level.
Then, attach your funnel, put the lid on and develop as normal.
You will need 24 oz. (700ml) of fluid for this method. However, this is considerably less than some larger sheet film tanks which can take as much as 64 oz. of developer, and is more economical as a result. Five sheets of film is not a full magazine, but is a decent number.
Photos
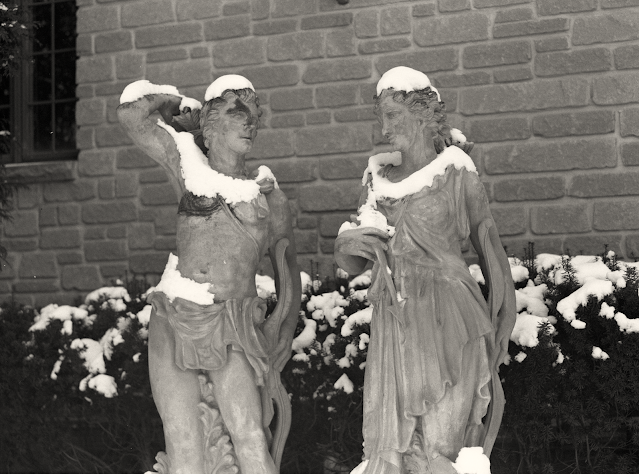
Without any further waiting, here's some of the photos I have taken with this camera on both the Plus-X Aerographic and Fortepan 400 films:
In using the Graflex, I must say it's very different than most other cameras, and it is challenging to use.
For one, the depth of field is extremely narrow on the 6 ⅜" Kodak Anastigmat lens and this takes some getting used to. I found that if you wanted any depth of field, you really need to shoot at f/16 or smaller apertures. That said, shooting at wider apertures gives a very extreme and in some cases attractive out of focus blur.
The Graflex also has some impressive mirror slap that gets some getting used to in order to take stable photos off hand. Even then, I still seem to have issues at shutter speeds slower than 1/75th and would recommend a tripod in those cases.
The focusing screen can be a bit challenging to use, it has no focusing aids to help you. It's easy to miss the focus in a scene when shooting in dim light or with a large aperture. It also becomes more difficult to use if you stop down before focusing, so I would recommend focusing and then stopping down if possible. An automatic diaphragm was added to the Super-D model, so if that is something you are looking for then it might be worthwhile to seek out that model.
That said, being able to see your image in focus, right side up is pretty great, which was one of the original selling points of the Graflex.
While 3¼" x 4¼" sheet film is less common today, I do think it hits the sweet spot in terms of image size to camera size. The 2x3 Graflexes are large cameras for a medium format negative, and the 4x5 cameras (not to mention the 5x7 or even 8x10 examples) are just too massive to carry around and hand hold. Additionally, the size of that large 3¼" x 4¼" negative is just great.
The Graflex "Bag Mag" Cut Film Magazine works much better than you would think for a box with a leather bag attached to the side. Changing films was not really any more difficult or time consuming than winding onto a new frame with a roll frame holder.
Despite the challenges to using it I really enjoyed shooting my my 3¼" x 4¼" Graflex RB Series D camera. It's a very unique experience and one that gives you a feel reminiscent of the turn of the 20th century. If you can find a nice example, and this is something you are looking for, I highly recommend picking one up.


Comments
Post a Comment